
If your recent air sample is not in compliance due to Water Vapor, this AirCheck✓ Tech Note™ may help you identify the source of your Water Vapor contamination.
A high Water Vapor reading may mean that the filter in the compressor has become saturated. When a filter cartridge becomes saturated it can no longer remove carbon monoxide and other contaminants. Please check your records and determine if it is time or close to the time when you should change the filter cartridges. If so, changing the filter usually corrects the problem. This AirCheck✓ Tech Note™ on water vapor has good info to help you identify the source of your contamination.
High temperatures at the inlet greatly reduce the life of a filter. Purification filters are rated for a specific number of hours at or about 70°F or a specific number of months. If the inlet temperature is higher than 70°F, your filters will not last the full rated amount. Statistically, we have a much higher rate of failure for water vapor during the summer months.
If the filter is not due to be changed, then you may have problems with the manual or automatic water drain or the priority valve on the compressor. Sometimes, the filter itself may be damaged or not seated properly in the filter housing. Things to also investigate are a recent hydrostat of storage bottles, the use of fill hoses greater than 5 feet in length, fill hoses left unpressurized and/or valves left open, recent de-pressurizing of filters, or relocation of the compressor.
Keep in mind that 1 milliliter (which is about 20 drops from an eyedropper) in a 1.7 cubic ft. cylinder at 4500 psig would be 90 ppm of water vapor. It doesn’t take much to fail.
The Onsite Detector Tube Test Also Showed High Levels of Water
The purpose of the onsite testing for water is for you to use the information and see if you can identify the problem, correct it, and then take a 2nd free test to determine if the problem has been fixed. Onsite water testing is designed to help you avoid lots of down time for your air system. Let’s discuss this further!
Sampling Notes for Water Vapor Detector Tube
- Break BOTH tips of detector tube before inserting. Arrow on tube points away from Fitting. 50 LPM for 10 minutes.
- The DT is filled with yellow filler material that reacts to the presence of water by changing color from yellow to a grayish/reddish brown. At any time during the 10 minute test if color change reaches 200 mark, remove tube and note elapsed time on data sheet.
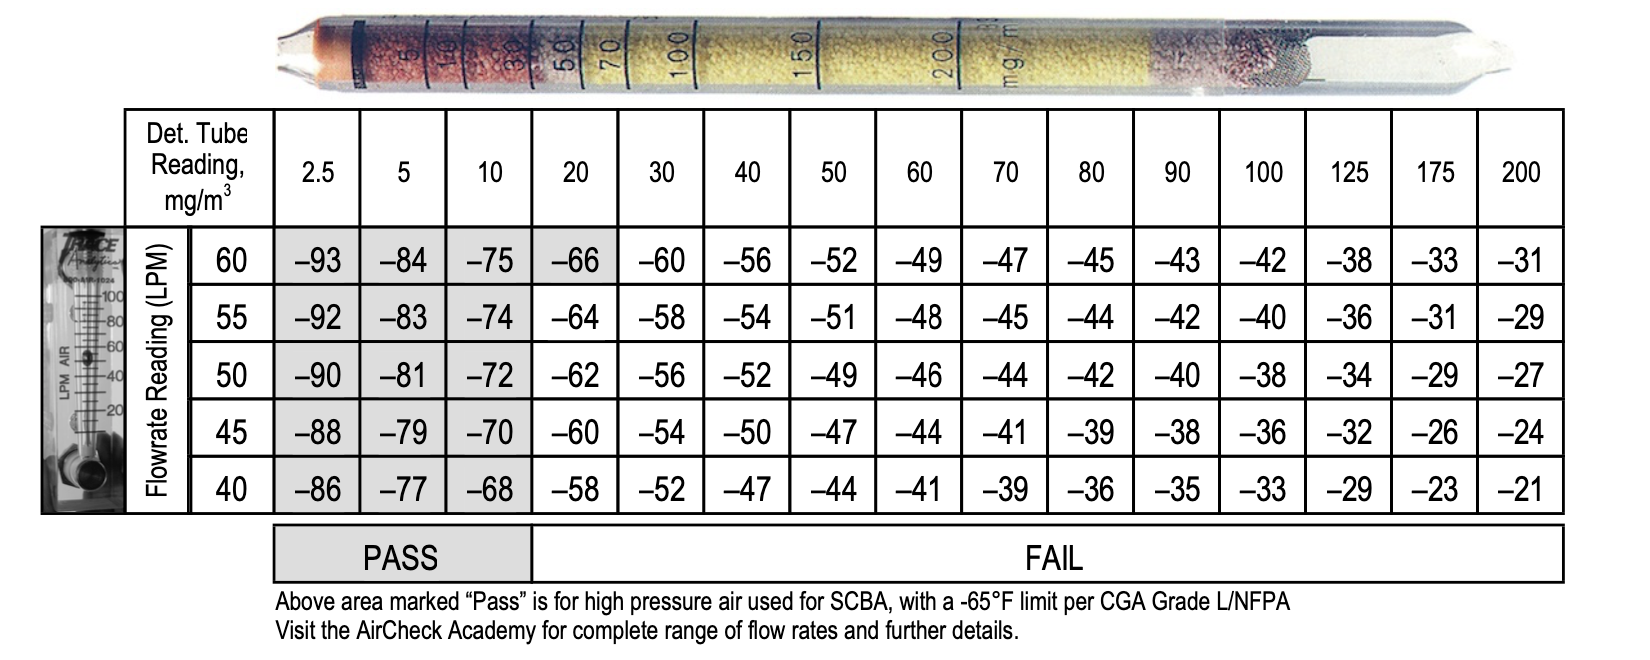
Reading the Detector Tube for High Pressure Air Used for SCBA
The purpose of providing a detector tube for onsite testing is to allow you the opportunity to correct a problem without having to wait for the complete report.
To determine if your sample passes:
- Identify the farthest color change on the tube between 0 and 200
- Locate that number on the chart on the graphic below
- Identify the flowrate you took your sample on the left hand side of chart between 40 and 60
- Where the two readings intersect is the approximate result in °F.
For example: If tube showed color change to 50, and flowrate was 50 LPM, the result would be -49°F. The number between 0 and 200 should be written on the data sheet not the dew point from the chart on the next page.
If your detector tube reading indicates that you have a problem (anything outside of the PASS area in chart above); go through the following checklist; take corrective action; then retake your sample to see if the problem has been corrected.
The 2nd test is free. Submit both samples for analysis to Trace’s laboratory.
Troubleshooting Checklist
- Purification Filters/ Depressurized Filters
- High ambient air temperatures (above 70°F) affect the operating life of the cartridge. Chemicals used in purification filters begin to degrade as soon as they are installed. Is it time to change the filters?
- Manual/Auto Drain or Priority Valve
- If not working properly this can be source for excess water and reduce filter life.
- Remote Fill or Hose Reel
- Long lengths (>10 ft) of hose are notorious for accumulating and retaining water. A short 1-2 minute purge WILL NOT be sufficient. It is best to take sample from a short fill hose (5-10 ft) or directly from containment fill station. – View our Resource Videos
- Recent Hydrostat
- Bottles must be properly dried after hydrostat and should be immediately pressurized with dry air.
- Valves Left Open
- Ambient air can easily have 10,000 – 50,000 ppm of water. Purge sufficiently to remove water accumulated from ambient air.
- Sample Taken from Storage
- Take a sample from compressor to identify if the compressor is producing dry air. If yes, storage banks may contain excess water. Drain and refill with dry air. This may require 2-3 fills to drive off water from inside cylinders. You can request extra detector tubes ($10 ea) to do several checks for water without doing a complete air sample.
- Detector Tube Cracked
- Only the tips of the tube should be broken. If a crack runs down the main body of the tube, results will not be dependable.
- Tube Fitting Wet
- If multiple samples are taken consecutively, excess water may pool inside the fitting. Dry fitting between uses. Keep in mind that 1 milliliter (which is about 20 drops from an eyedropper) in a 1.7 cubic ft cylinder at 4500 psig would be 90 ppm of water vapor. It doesn’t take much to fail.
If you have further questions, or need assistance in resolving this problem, please Contact Us or give us a call at 1-800-247-1024. You are entitled to a free resample. Please use the supplies you have on hand to take a retest. Once we have received your sample (you have 30 days) we will restock your kit.
The AirCheck✓™ Team of Experts at Trace would like to thank you for your continued business!